

Table of Contents
- Why Modern Extension Ladder Safety Features Matter on Site
- Extension Ladder Inspection: What to Check Before Every Climb
- Duty Rating, Load Capacity, and Ladder Length: Reading the Label
- The Safe Ladder Angle and the 4-to-1 Rule
- How to Tie Off an Extension Ladder and Prevent Slipping
- Stability on Uneven Ground: Non-Slip Feet, Stabilizers, and Levelers
- Your Extension Ladder Safety Checklist for Every Job
- Frequently Asked Questions
Last Updated: October 20, 2026
Why Modern Extension Ladder Safety Features Matter on Site
Extension ladder incidents rarely happen because someone was careless. They happen because a worn rung lock, a missing foot pad, or a soft patch of ground went unnoticed until it was too late. The safety features of modern extension ladders exist to close that gap, and understanding the safety features of modern extension ladders is the difference between a tool you trust and a tool you hope holds.
This guide from Distributor of Little Giant LTD breaks down what those features are, how to inspect them, and where they fail.
Here is what we will cover: inspection points, duty ratings, the 4-to-1 angle rule, tie-off methods, and how to handle uneven ground.
Extension Ladder Inspection: What to Check Before Every Climb
An extension ladder inspection is a quick visual and hands-on check of rails, rungs, locks, feet, and ropes before every use. It takes under two minutes and catches the defects that cause falls.
Walk the full length of the ladder. Look for cracks, dents, and bends. Test every moving part by hand. If something feels loose or does not snap into place, stop.
Side Rails, Rungs, and D-Rungs: Spotting Damage Early
Side rails carry the load. Any crack, deep gouge, or bend in a rail means the ladder is out of service. Do not try to straighten a bent rail.
Rungs and D-rungs take the most abuse. Check for:
- Cracks at the rung-to-rail joints
- Loose or spinning rungs
- Bent D-rungs that no longer sit flat
- Missing or worn tread on the rung surface
A rung that spins underfoot is a fall waiting to happen. Retire the ladder.
Rung Locks, Rail Interlocks, and Locking Mechanisms
Rung locks hold the fly section at height. Rail interlocks keep the two sections aligned. Test both by extending the ladder fully and listening for a solid click at each lock.
Then apply downward pressure on the fly section. It should not move. If a lock slips, the ladder drops without warning.
Duty Rating, Load Capacity, and Ladder Length: Reading the Label
The label on the side rail is the ladder's specification sheet, and most users never read past the first line. It tells you the duty rating, the load capacity, the maximum extended length, and the standards the ladder was tested against. Understanding all four is how you match a ladder to a job instead of guessing.
Duty rating is a load class, not a single number. In the US, ladder duty ratings follow a tiered system, Type III, Type II, Type I, Type IA, and Type IAA, each tied to a maximum working load that includes the user, tools, and materials. In Europe, EN131 sets the load and test requirements, and the label should show the standard and the maximum load. The rating is not a suggestion.
Load capacity is the figure that pairs with the rating. Our fiberglass and aluminum models carry up to 150 kg. Check the label on the specific ladder, not the catalog page, the same model family can have different ratings across sizes.
Ladder length is not working height. You lose length to the overlap between the fly and base sections and to the angle. A ladder set at the correct 4-to-1 angle reaches roughly one quarter of its length less than its full extension. The minimum overlap is marked on the ladder; too little overlap weakens the section joint and is a common cause of failure on older ladders.
| Label Item | What to Look For | Why It Matters |
|---|---|---|
| Duty rating | Matches your load plus tools | Overloading bends rails and stresses locks |
| Load capacity | 150 kg on our models | Exceeding it risks collapse |
| Maximum length | Full extension figure | Working height is lower |
| Overlap | Minimum marked on the ladder | Too little overlap weakens the joint |
| Standard | EN131 or the applicable local standard | Confirms the ladder was tested to a recognized rule set |
If the label is missing or unreadable, treat the ladder as unrated and remove it from service until you can confirm its class. A ladder with no readable rating cannot be matched to a load, and that is a documentation failure as much as a safety one.
The Safe Ladder Angle and the 4-to-1 Rule
The safe ladder angle is one unit out for every four units up. That is the 4-to-1 rule, and it puts the ladder at roughly 75 degrees from the ground.
Get the angle wrong and you change the physics. Too steep, and the ladder tips backward. Too shallow, and the feet slide out or the rails bow.
A quick field check: stand with your toes against the feet and reach straight out. Your fingertips should touch a rung at shoulder height. If they do not, reset the ladder.
- Measure the height to your landing point
- Divide by four to get the distance from the wall
- Mark the feet position before you raise the ladder
- Check the angle again after the ladder settles
How to Tie Off an Extension Ladder and Prevent Slipping
Tying off an extension ladder means securing the top of the ladder to a fixed structure so it cannot shift, slide, or blow over. It is the single most effective step against slipping.
Use a ladder tie or a rated strap. Wrap it around both side rails and the anchor point, then cinch it tight. Never tie off to a gutter, a window frame, or anything that could pull free.
If you cannot tie off at the top, secure the feet or use a stabilizer. Some jobs need both.
Stability on Uneven Ground: Non-Slip Feet, Stabilizers, and Levelers
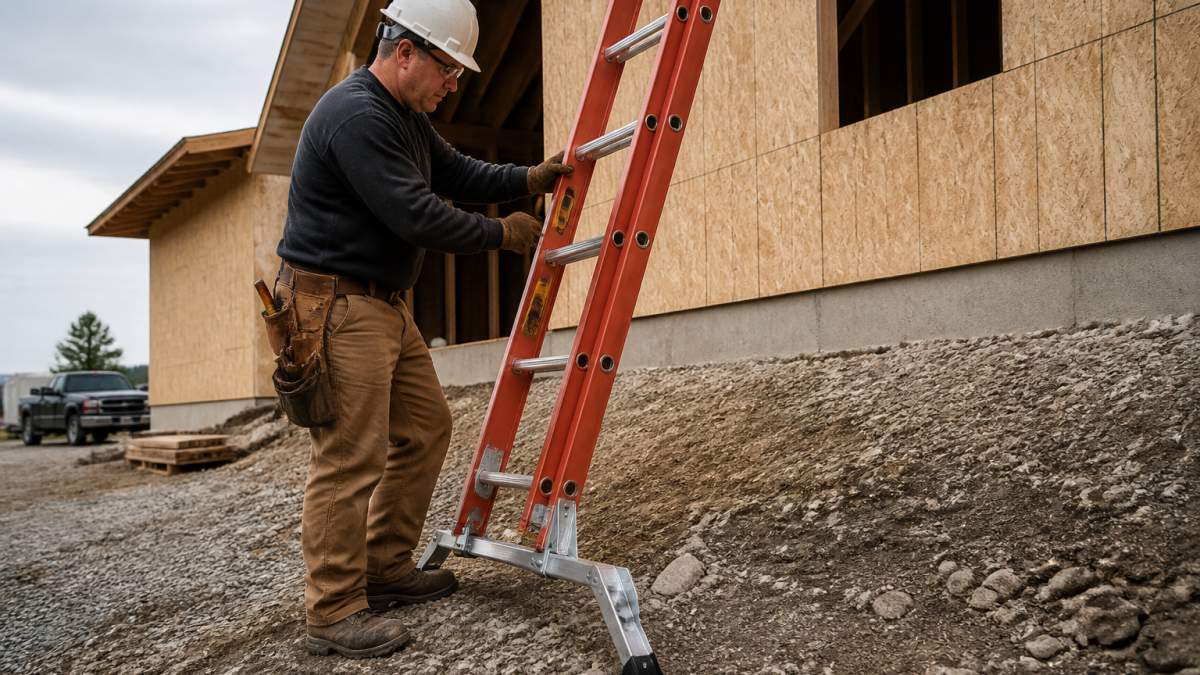
Non-slip feet grip hard surfaces. They do not fix a slope. On uneven or soft ground, the goal is to get both feet fully loaded and the rails plumb, and that takes stabilizers, levelers, or a decision not to set up at all.
Start by reading the ground. Firm, flat concrete or asphalt needs only the ladder's own feet. Gravel, soil, and sand need a load-spreading board under each foot, a wide, rigid plank that keeps the feet from sinking or kicking out. Slopes need levelers or adjustable stabilizers that let each leg reach the ground independently. Never stack blocks under one leg or prop a foot on a brick or toolbox; a single-point prop concentrates load and the ladder will shift the moment you climb.
Modern designs address this in different ways. External stabilizers widen the base and cut the risk of sideways tipping. Side-mounted bubble levels and ground-contact indicators tell you when the ladder is level before you climb. Our HyperLite® with Sumostance® uses external stabilizers that more than double the base width, and the Conquest™ All-Terrain has independently adjustable leveling stabilizers for sloped ground.

A practical check before climbing: stand back and look at the ladder from the side and from the front. The rails should be plumb in both views, both feet should be fully seated, and the level indicator should confirm it. If any of those fail, reset the ladder rather than climbing and hoping.
Your Extension Ladder Safety Checklist for Every Job
Use this extension ladder safety checklist before every climb. Print it, laminate it, and keep it on the truck.
- Inspect side rails for cracks, bends, or gouges
- Check every rung and D-rung for damage or looseness
- Test rung locks and rail interlocks under load
- Confirm duty rating covers you plus tools
- Set the ladder at the 4-to-1 angle
- Extend 3 feet above the landing point
- Check non-slip feet for wear and grit
- Use stabilizers or levelers on uneven ground
- Tie off the top to a solid anchor
- Keep three points of contact while climbing
- Never stand on the top three rungs
- Face the ladder and climb down, never jump
For a second opinion on standards, the Health and Safety Executive ladder guidance sets out safe setup and use, and OSHA's ladder standards cover extension ladder rules for US sites. Our own ladders are certified to EN131, and the European Committee for Standardization maintains the EN131 family of standards.
One more point worth making. Modern safety features help, but they do not replace judgment. A stabilizer will not save a ladder set on a slope with one foot in the air. A rung lock will not hold if you never tested it.
The challenge is not knowing the rules. It is finding equipment that holds up on real terrain, job after job. At Distributor of Little Giant LTD, we supply multi-functional ladders built for exactly that: patented stability systems, aviation-grade aluminum rated to 150 kg, EN131 certification, and a lifetime warranty. With more than 50 years of innovation behind the brand, these are ladders you can inspect, trust, and rely on. Get started with Distributor of Little Giant LTD and put a ladder under your team.
Frequently Asked Questions
What safety features should a modern extension ladder have?
A modern extension ladder should include non-slip feet, rung locks and rail interlocks that engage fully, and a duty rating clearly marked on the label. Fiberglass models add electrical non-conductivity for work near power lines. Stabilizers or leveling systems, like those on the HyperLite® with Sumostance®, widen the base and reduce sideways tipping on uneven surfaces. Side-mounted bubble levels help you confirm a safe ladder angle before you climb, and a rope and pulley system makes extending the fly section controllable from the ground.
What is the safe angle for setting an extension ladder?
Set the ladder so the base sits one unit out for every four units of working height, known as the 4-to-1 rule. For a ladder reaching 4 metres to the landing point, the feet should be roughly 1 metre from the wall. Too steep and the ladder can tip backward; too shallow and the feet can slide out. Use a side-mounted bubble level where the ladder has one, and always extend the ladder at least 3 feet (about 1 metre) above the landing point before stepping off.
How do you tie off an extension ladder safely?
Extend the ladder at least 3 feet above the landing point, set the correct angle, then secure the top of the side rails to a solid anchor point with a ladder tie or strap rated for the load. Never tie off to gutters, window frames, or anything that can move. If the top cannot be secured, have a second person foot the ladder at the base. Check that both rung locks are fully engaged and the ladder cannot shift before you climb.
How can you prevent an extension ladder from slipping on uneven ground?
Start with non-slip feet and clear the ground of loose gravel, mud, and debris. On soft ground, use a firm base plate or board under the feet. Ladders with independent leveling legs, such as the Conquest™ All-Terrain, let you adjust each side separately so both feet sit flat on sloped terrain. Always confirm the safe ladder angle with a bubble level, engage both rung locks fully, and tie off the top where possible before climbing.